Tuesday, April 26, 2011

Fundamentals

Here's a link/text to the series I'm writing for The Art of Manliness.

1 Onion, diced
2 Tomatoes, roughly chopped
1 Jalapeno, finely diced
2 Cloves Garlic, minced

As someone who writes recipes for a living, it’s my job to make cooking easy and enjoyable for others. I suppose my “job satisfaction” comes when people tell me that a recipe of mine turned out to be one of their favorite meals. However, I’m not always so lucky.

Things that may seem clear to me can look like hieroglyphs to others.
For example, check out the list of ingredients at the top of the page. Hopefully, the ingredients themselves are recognizable to everyone. What may not be so clear is the actual state of the ingredients. What do I mean by diced, chopped, minced?
Honestly, it’s somewhat of a gray area.

You see, each writer, chef, cook, etc., has their own explanation of such terms. Some go as far as providing exact descriptions-“dice your tomatoes into ½ inch cubes .” I suppose that’s nice, but such rigid descriptions remind me of baking-not my forte.

I’d rather not pull out a Webster dictionary, so instead I’ve put together a simple picture to demonstrate the following state of ingredients in descending order based on size: Roughly Chopped, Julienned, Diced, Finely Diced, and Minced. Keep in mind that this is my definition. You or others may envision a fine dice to be finer, or a rough chop to be rougher . . . that’s okay. I come from the school of thought where recipes are meant more to be guidelines than scientific formulas. Again, that’s probably the reason why baking is not my strong suit.


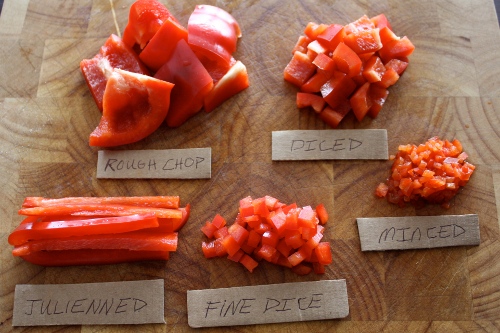
When working with peppers as pictured, always cut from the inside out-the waxy outer surface can cause the knife to slip.

Basic Skills

I’ve put together a few picture reels to assist you in some of the very basic knife skills.  Specifically, I’ve included photos on the best way to go about dicing an onion, mincing/pasting garlic, and finely chopping herbs.  I find that these are the skills that I use most in preparing meals.   

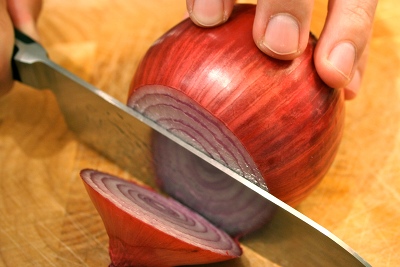
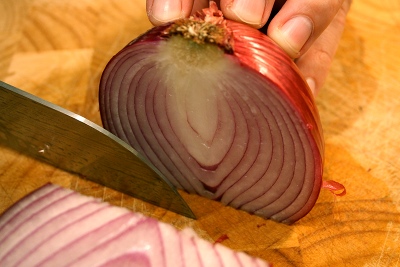
Dicing an Onion - by keeping the root end intact, this method will ensure that you can quickly dice an entire onion without creating a mess.  Keep in mind that the more narrow your incisions, the finer the dice.

Step 1:  Slice off the top of the onion, about ½ an inch into the surface. 
Step 2:  Rest the onion vertically, and slice in half through the root end, peel back outer layer. 
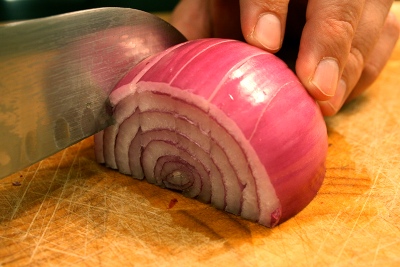
Step 3:  Make vertical incisions down to the root end. 
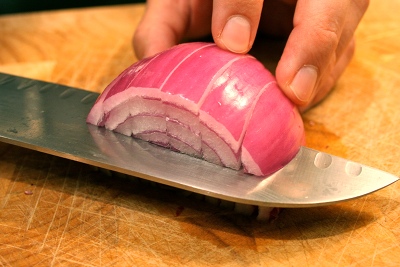
Step 4:  Make horizontal incisions down to the root end. 
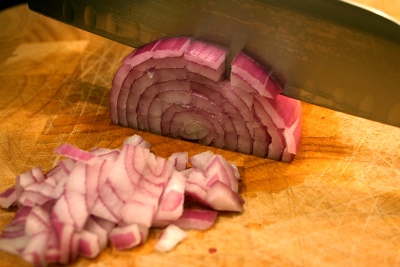
Step 5:  Dice the onion accordingly and repeat with the remaining half.  


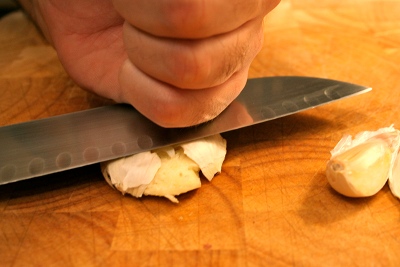
Mincing/Pasting Garlic - this method will allow you to quickly peel and mince garlic.  By smashing the entire clove, you also release the flavorful juices.  Adding kosher salt and making a paste comes in handy when adding garlic to a salad dressing or marinade.
Step 1:  Smash the entire clove, skin on, with the sharp end of the blade pointed away from your body.
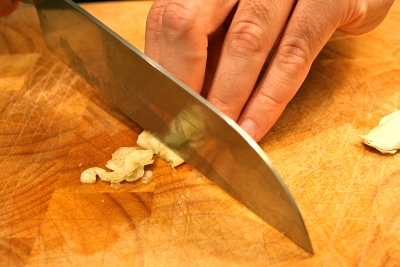
Step 2:  Peel away skin, and run the knife through the garlic until it is finely and evenly chopped. 
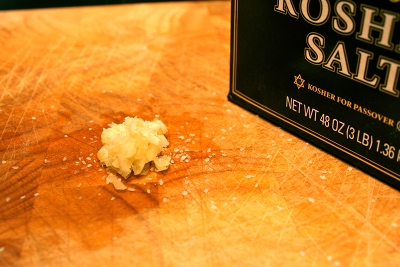
Step 3:  Add a few pinches of kosher salt to work as an abrasive.
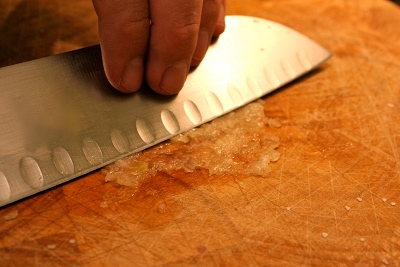
Step 4:  Use pressure and the flat side of your knife to work the ingredients back and forth on the board, until the mixture resembles the consistency of a paste.


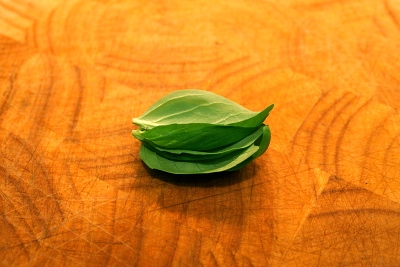
Chopping Fine Herbs - this process is actually defined as a “chiffonade”.  For herbs which bruise easily (basil, sage, etc), this method allows you to cleanly and delicately slice herbs without damaging their texture. 

Step 1:  Stack 6 -8 leaves on top of one another.
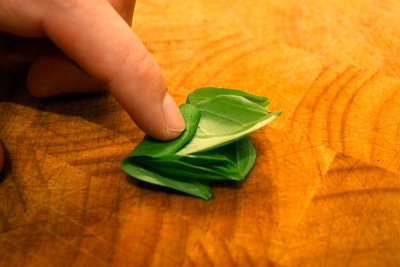
Step 2:  Carefully roll up the leaves starting from the root end up to the tip.
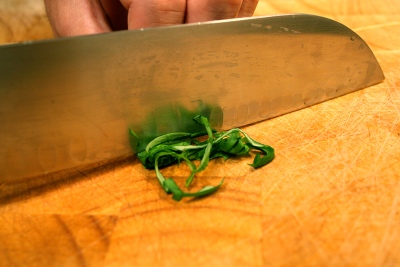
Step 3:  Use a knife to finely chop the herbs, resulting in long, thin strips.


Of course, these are just the fundamentals.  Master everything here, and we’ll move on to butchering wild game in the near future.

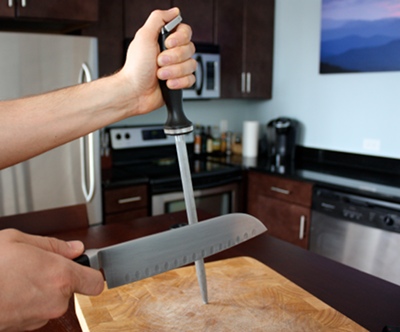
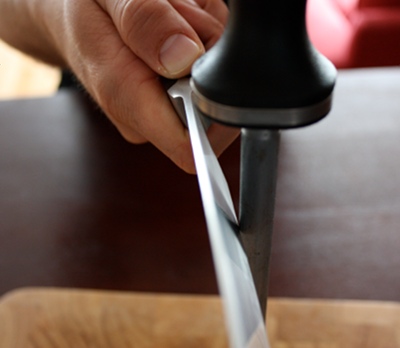
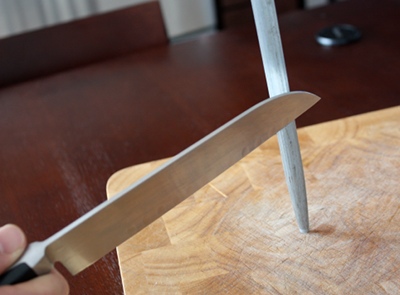
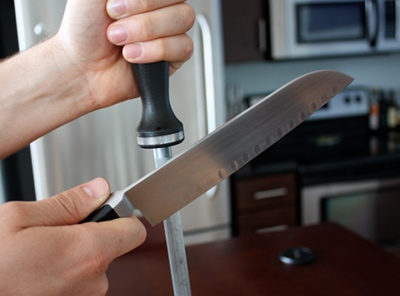
Keep those knives sharp!
MM 

Thursday, April 21, 2011

Tools for the Job

Please visit The Art of Manliness for an interesting new series that I've been writing on kitchen fundamentals.  Text/Pictures below.

Dog : Man :: Knife : Chef.

If you are having trouble understanding the analogy above, allow me.  A good knife is a chef’s best friend.  Whether used to delicately slice paper thin vegetables, to crush through bones and tendons, or simply to remind those around you to “get out of your kitchen,” knives are an essential kitchen tool-the most essential tool, I might argue.

Personally, I use one knife about 95% of the time: 
an 8-inch top quality chef’s knife.  Don’t let the high price tag scare you.  A well-crafted knife lasts for decades, and it’s worth the investment.  Because I tend to be a minimalist in the kitchen, I’m always looking for tools that can accomplish several different tasks in one.  I’d rather have one expensive knife that can complete 4 - 5 different tasks than invest in an individual tool for each job.  Besides, there’s less cleanup my way.

So, how do you choose a good knife?  Well, if the chef’s knife in your $60 wood block set is letting you down, there’s probably a good reason.

You get what you pay for.

In cooking, I always say that great meals start with using great ingredients.  That philosophy is also true for knives-it’s all about
material.  Top quality knives are forged using the highest quality of finely polished stainless steel.  Though other materials-including ceramic-have recently been introduced to the manufacturing process, stainless steel remains the preferred choice for most chefs.  The weight or feel of the knife should also reflect quality.  There should be no joints between the blade and the handle, i.e. seamless integration.  The handle should allow for a secure grip, while also being comfortable for use over time.  Regarding the surface, the overall appearance of the blade should be smooth and highly polished, serving as sign that the knife is resistant to rust and corrosion.   And finally, the cutting edge should retain its sharpness over time.  Of course, the last quality is the most subjective to both use and care.

Knives should always be kept as sharp as possible-more on this later.  Working with a dull knife causes one to use more pressure, which increases the risk of the blade slipping while cutting.  I prefer to always work on a wood or plastic cutting board.  These types of surfaces
give to the blade versus a glass or ceramic surface, which helps retain the edge.  Of course, you always want to cut away from your body.  Like most of my more expensive cookware, I prefer to hand wash and dry my knives instead of using the dishwasher.  This ensures that the knives are not damaged should they come in contact with other objects.  Lastly, always store knives in a knife block or secure tray when not in use.

Though my chef’s knife is my work horse, there are other types of knives and tools that I find particularly useful.  From left to right, they are as follows.


Steel - a tool used to sharpen knives.
Serrated Utility Knife - used for slicing bread, meats, or other foods with a hard crust or outer skin.  Also great for cutting juicy or soft vegetables such as tomatoes.
Cleaver - used to de-bone or butcher larger cuts of meat where more weight and less precision is needed.
Chef’s Knife - the most used and versatile knife in the kitchen.  Used for slicing, dicing, chopping or de-boning smaller cuts of meat.
Filet Knife - a sharp and slim bladed knife for filleting fish or removing and trimming fat and silver skin from tenderloins.
Paring Knife - a small, versatile knife used to peel, cut, or clean fruits and vegetables.

Honing Kitchen Knives


Depending on the amount and type of use, I recommend having your blades professionally sharpened every 12 - 18 months.  Many of your local kitchen supply stores offer this service for $5 - $7 per knife to restore the original edge.  Of course, you can always invest in an electronic sharpener to keep at home.  Between uses, you can keep your blade sharp by using a sharpening steel.   Keep in mind that serrated knives should maintain their edge and should not be sharpened.

Step 1: Hold the steel and knife in opposing hands, firmly gripping the knife and holding the steel down, away from the body.
Step 2: Place the heel edge of the knife at a 20 degree angle from the steel.
Step 3: Pull the knife down the steel, from heel to tip, maintaining an angle of 20 degrees.
Step 4: Repeat this procedure 4 - 6 times, alternating between the left and right side of the blade.

Sunday, April 17, 2011

Grilled Chicken Kebabs over Orzo Pasta Salad


A very productive weekend here.  One might even call it a Spring cleaning of sorts.  Clean house, clean car, clean laundry, and most importantly - clean kitchen.  After so many months of travel, it's easy to neglect all of the things 'round the house that need to be maintained.  Well, it's all shining, fresh, and running like a well oiled machine around here.

Feels good.

Staring down a few weeks of travel catching up with family and friends so I may not be quite as busy here.  Hopefully you've noticed that I've picked things up the past few weeks.  I honestly wish that many of you will give the diet and lifestyle plan a try.  It seems simple, but lots of thought and hard work have gone into that outline.  Of course, I've got a book full of recipes and workouts to add should we get interest out of a publisher - but for now - let me know your thoughts, criticisms, and most importantly your success stories.

Along those same lines, I put together one of my favorite meals for tonight's Sunday dinner.  After two days of cold, grey weather here in Nashville, the sunshine and bluebird skies finally broke through.  I wanted a light, summer-esque meal to pair with the glorious weather we enjoyed today.  So, enjoy!

Keep peaceful!

MM

Grilled Chicken Kebabs
1 Lb Chicken Tenderloins
1 Red Onion, roughly chopped
1/4 Cup Extra Virgin Olive Oil
2 Tablespoons Red Wine Vinegar
1 Tablespoon Oregano
1 Teaspoon Salt
1 Teaspoon Ground Pepper

Combine all ingredients into a large bowl and allow to marinate for 30 minutes.  Meanwhile, soak bamboo skewers in water.  Preheat grill to medium high.  Skewer chicken and onions, careful not to over crowd and place on grill.  Grill 2-3 minutes on each side, or until chicken is firm to the touch and cooked through.  Serve.

Orzo Pasta Salad
1 Cup Orzo Pasta
1/4 Red Onion, finely diced
1/2 Cucumber, finely diced
1 Tomato, finely diced
1/4 Cup Feta Cheese, crumbled
1/4 Cup Extra Virgin Olive Oil
Kosher Salt
Fresh Cracked Pepper

Over high heat, bring water to a boil and cook orzo pasta 6 - 7 minutes, or al dente.  Drain, rinse, and cook completely.  Combine the remaining ingredients, seasoning to taste with salt and pepper.  Cover and place in fridge until chilled.  Serve.

Thursday, April 14, 2011

From Dinner to Breakfast

So yesterday's post was all about creating a healthy and delicious meal using only minimal ingredients.  Based on the feedback, it seems that everyone likes things that are quick and easy . . . hmmm, I'll stop there.

Sometimes I get asked if it feels strange to constantly post items that I eat on the internet each day.  Of course, it's a bit weird, but I suppose that's how the story is best told.  I stand behind my writing, recipes, and work - because it's truly my lifestyle.

I'd made mention that the Fresh Cuts Salsa used in last night's recipe is an excellent base for a veggie omelet in the morning.  Well, I made good on that mention with an outstanding and tasty omelet this morning.

Guess what - it also comes in at under 5 ingredients - utilizing quite a bit of the same ingredients from last night.  Nothing like keeping things consistent, simple, and affordable.

Enjoy!


MM
Quick Veggie Omelet
1 Teaspoon Extra Virgin Olive Oil
2 Tablespoons Fresh Cut Salsa
3 Eggs, beaten
Cajun Seasoning
Pepper Jack Cheese


Heat a 10 inch non-stick skillet over medium heat; add oil.  Add salsa and saute for 1 minute.  Lightly season eggs with Cajun seasoning and add to pan.  Allow the eggs to set on the bottom of the pan.  Using a wooden spoon or plastic spatula, gently lift the cooked portions of eggs from the bottom of the pan, using a tilted motion to allow the uncooked eggs to reach the heat.  Continue in this manner until no more runny portion remains.  Use a spatula to flip the omelet (or flip in pan).  Cook for another minute.  Add cheese to one side of the omelet, fold, and serve.


Wednesday, April 13, 2011

5 Ingredients or Less

These days, it seems that everyone is obsessed with recipes that contain only five ingredients.  Books, magazines articles, and even television shows are all represented by this philosophy of cooking.

I must admit - my original title to Have Her Over for Dinner was How to Get Laid in 5 Ingredients or Less . . . but being a Southern gentleman, I just couldn't go through with it.  Besides, it takes a lot more than 5 ingredient cooking to win the right kind of girl.

Anyways, I figured that after yesterday's diet and lifestyle post, I would provide a simple, affordable, and healthy recipe - with only 5 ingredients to boot!

Never afraid to take a shortcut here and there, I've utilized a store bought fresh salsa from Fresh Cuts to finish off the meal.  It's a great condiment to keep on hand at all times - it also makes for an easy and quick add to a veggie omelet in the morning.

Keep it Simple - Keep it Healthy - Keep Peaceful!

Pan Seared Tilapia over Black Beans
1 Can Black Beans
1 Tablespoon Extra Virgin Olive Oil
2 6 - 8 oz Talapia Filets
Cajun Seasoning
Fresh Salsa


Add entire can of black beans into a small pot over medium heat.  Bring beans to a slow simmer, lower heat and leave uncovered to reduce and thicken.  Meanwhile, heat a 10 inch non-stick pan over medium high heat; add oil.  Season fish filets liberally on each side with Cajun seasoning and add to pan.  Pan fry for 2 - 3 minutes on each side, turning once.  Begin plating by placing a generous portion of black beans on one half of the plate.  Carefully rest the fish filet on top of the beans, and top the filet with fresh salsa. Serve.

Tuesday, April 12, 2011

No, Low, Go Diet

Why do what I do?  Good question.

Besides a passion for cooking, eating, and drinking, my writing on food serves two main purposes.  One, to teach individuals that cooking great meals at home is simple, realistic, and affordable.  Two, to help people enjoy a healthy and balanced lifestyle by promoting the benefits of eating REAL food.

At the risk of sounding political or getting on my soapbox, I’ll let the facts speak for themselves.  After all, who am I to say what’s right and what’s wrong. 

We are fighting a major problem in America.  Obesity is killing Americans, while also draining our tax dollars.  Within the next two decades, it is estimated that 86 % of Americans will be overweight or obese - at a taxpayer cost of $956 Billion.

Two words:  Serious Problem.

Fortunately, there’s quite a bit of good things going on to bring about change.  Cheers to Chef Jamie Oliver and the success of his Food Revolution program which airs in its second season this week.  It’s about time a show about doing good things made it on the air, won an Emmy, and is up for a second season.  Forget the Housewives or the Kardashians . . .

I’m not a dietician, medical doctor, licensed trainer, or even a chef.  However, I do know what works when it comes to losing weight - for me and others.  After playing sports throughout my entire life, I always enjoyed a high level of physical fitness.  That was of course, until college.  I blame it on the Sierra Nevada Pale Ale and Pizza diet.  Four years of abuse put me about 40 - 50 lbs overweight.  I couldn’t believe that I’d let myself get to such a point.

By reincorporating exercise and healthy eating into my lifestyle, I was able to get back into fighting weight in less than a year . . .  eventually getting to the point where I now enjoy competing as a marathon runner.

Friends of mine have seen my success, and they have often asked - “how did you do it”?  It’s not rocket science.  It all boils down to exercising and eating the right kinds of foods -in moderation.

I began sketching the following ideas out in a book proposal last year.  Several friends asked for the information, and they have been successful in dropping 30, 40, 50 lbs to reach their target weight.  Perhaps this ‘sketch’ is much simpler to follow than a 300 page book - I don’t know.  However, I do know that it works.

In today’s age of free information - I wanted to share this initial outline to help do my part in bringing about change.  Please add your own comments, success stories, criticisms, etc.  Whatever makes this better can make us all better.

Create change.  Be uncommon.  Become your best! 

MM

The NO, LOW, GO Diet

Don’t starve your body - eat the right kinds of foods to keep your metabolism constantly working in your favor.  Don’t consume more than you burn.  It’s okay to indulge every so often - so long as you bust your ass via exercise to make up for it.  Your success is determined by YOU.

NO
Fast Food
Soft Drinks
Processed Foods
Fried Foods
Energy Drinks
White Starches (Breads, Potatoes, Pasta, Rice, etc)
Cream Based Soups (Chowders, Bisques, etc)
Mayonnaise
Mayo or Cream based Salad Dressings (Ranch, Thousand Island, Blue Cheese)

LOW
Alcohol (Wine, Beer, Liquor)
Carbs (must come from whole grains)
Salad Dressing (Oil, Vinegar, Italian, Low Fat Dressings) on the side
Whole Grains (Pasta, Rice, Breads)
Sweet Potatoes
Oatmeal (Stick to Protein based raw forms)
Kosher Salt
Fruit Juices
Yogurt, Low Fat or Greek
Sport Drinks (Gatorade, Vitamin Waters, etc)  Check Sugar/Carb Content.
Unsalted Butter
Sour Cream
Frozen Health Foods (Lean Cusines)
Appetizers at restaurants (start with a salad instead)
Desserts (Chocolate, Cakes) … stick to fruits, yogurts, and cheeses

GO
Water (At least 8 glasses per day)
Lean Protein (Chicken, Turkey Breasts, Pork, Seafood, Lean Red Meat)
Vegetables
Fruits (esp, Black/Blue/Cran/Strawberries)
Beans (Black Beans, Kidney Beans, Pinto Beans)
Hummus
Almonds
Salads
Vegetable or Low Fat Broth based Soups
Eggs
Olive Oil

BREAKFAST is the most important meal of the day.  It gives your body the chance to start your metabolism (fat burning furnace) first thing in the morning.  The problem is most people skip breakfast thinking they’ve reduced their overall caloric intake for the day.  What happens?  Your metabolism doesn’t start.  You overeat at lunch or from snacking because you feel entitled.  Instead - EAT BREAKFAST.  I’m not talking about cereals, bagels, or pastries.  The worst thing you can do is start your day off with sugar and carbs.  This spikes your blood sugar, which shuts down your metabolism, only to cause a mid-morning crash which will likely lead to overeating later in the day.  Eggs are our best friend in the morning.  Full of protein, and virtually without carbs, we want to focus our efforts on eating eggs as much as possible for breakfast.  Forget the cholesterol scares of the 1980’s… eating the whole egg - not just the whites, has actually been shown to improve ‘good’ cholesterol levels.  1 - 3 eggs each morning, is a simple and easy breakfast.  Vary your preparation method - scrambled, fried, poached, hard boiled, or even as a simple omelet with diced veggies and low fat cheese so that you don’t get stuck in a routine.  If you can’t cook, or don’t think you have time - invest in a microwaveable egg poacher.  It turns out a decent poached egg in under a minute - without any added fat. 

SNACKS are a good thing, so long as you make the right choices.  Again, think about reducing your carbs to keep your metabolism burning.  As you start to get hungry a few hours after breakfast, add another log to the fire by choosing snacks that are full of protein and low in carbs as described below.  Power through the afternoon with a second snack to provide energy before an evening workout.

LUNCH can be difficult because you are often forced to eat out.  The chef at your favorite restaurant has one thing in mind - taste.  He’s not interested in your health, diet, or well-being.  Salt, saturated fats, oils, cream, butter, etc are all used in order to make ‘bland’ food taste incredible.  I’ve laid out some options at some of your favorite restaurants to make your choices easier.  Keep in mind our basic philosophy whenever ordering.  Think lean proteins (chicken, fish, lean red meats) that are prepared without extra fat (grilled, roasted, baked) along with vegetables (steamed, sautéed, grilled, roasted) and whole grains (brown rice/pasta).  Most restaurants do not offer whole grain choices - in these instances, sub out the baked potato, fries, rice, pasta, etc for a double serving of vegetables or a side salad.  Speaking of salads - this should be your go to lunch option.  Think greens with plenty of vegetables and some sort of lean protein to keep you full.  Dressings should always be served on the side.  No white dressings (Ranch, Blue Cheese, etc).  Choose oil and vinegar, reduced fat dressings, or simply lemon juice and olive oil.

DINNER should be eaten as early as possible.  You want to allow your body time to digest and process your food.  This will not only aid in sleep and digestion, but it will also ensure that you wake up hungry to eat breakfast.  You will encounter the same problems at dinner as with lunch, as this tends to be a ‘social’ meal.  Follow the same guidelines when dining out, remembering that your choices will dictate your damage.  Keep alcohol to a minimum.  I endorse a glass of red wine at every dinner.  If you try to go too extreme, like cutting out all alcohol, sugar, etc - you will most likely fail.  Keep it in moderation.  1 - 2 glasses of red wine at dinner or in the evening is perfectly acceptable.

DESSERT should be in moderation.  Remember that you are trying to keep your sugar/carb intake at a minimum.  Go for non-fat yogurt dressed up with sliced fruits, or even grilled fruits when the craving for something sweet arrives.  Of course, if you can’t resist the temptation, eat slowly, savor the food, and eat less.

BREAKFAST
Option 1 (Eat Most Often)
3 Eggs (Scrambled, Fried, Hard Boiled, Veggie Omelets)
Option 2
Non-Fat Greek Yogurt (Higher in protein)
Granola (Bear Naked Peak Protien)
Fruit (Apples, Mixed Berries - Blueberries, Strawberries, Raspberries, etc)
Option 3
Hummus
Fruits and Vegetables

Morning/Afternoon SNACK OPTIONS (Pick One or Two) 
Palm full of Almonds
2 Hard Boiled Eggs
Low Fat Cheese (String Cheese), Mozzarella, Cottage Cheese
Apple
Protein Bar (Check Sugar/Carb Content)
Bear Naked Peak Protein Granola (Handful)
Hummus (2-3 oz) and Veggies
Can of Tuna (dress up w/ lemon juice, salt, pepper)
5-6 Whole Grain Triscuits and low-fat cheese slices

LUNCH

Salads with a lean protein (Dressings on Side)
Grilled/Roasted Proteins with Vegetables
Low Fat/Low Carb Broth based Soups (Vegetable Soup, Chicken Noodle w/ whole grain pasta, etc)

DINNER
Grilled, roasted, pan seared lean proteins (olive oil)
Beans/Legumes
Vegetables (steamed, roasted, pan sautéed)
Fist sized portion of Brown Rice, Sweet Potatoes, or Whole Grain Pasta
1 Glass of RED wine

NO EATING PAST 9:00 p.m.

Monday, April 11, 2011

Dessert


I've never been a huge fan of dessert.  Honestly, if given the choice between doubling the size of my entree, or eating a normal portion + dessert, I'll up-size my meal any day of the week.  I suppose my taste buds lean more towards the savory than the sweet.

But, for all you gentleman out there, dessert is a necessary part of the in-home dating and dining experience.  Not necessarily because it is 'needed', rather it is 'expected'. 

The object of your desire wants to finish off her meal with an indulgent treat.  She'll also make the claim that she 'never treats herself' to such calorie-laden delights.  Sure, we know better, but then again it's best to just play along.  Let her know that it's cool to indulge and she'll be eating out of your hand in no-time.

With that said, I'm already moving mountains by getting you into the kitchen.  I don't really expect, nor do I want you to start baking pastries, pies, cookies, and brownies . . .

Keep your desserts simple.  Grill a ripe pear, peach, nectarine, or even an apple until lightly charred and sprinkle with brown sugar and Cinnamon.  Serve it a la mode, garnish with a sprig of fresh mint, and you are in business.  Too hard?  Combine some fresh fruit, granola, and yogurt together for a quick and easy parfait.  Still too hard?  Go buy it somewhere!  I'm serious.  Take a store bought dessert, and make it your own.  Buy a brownie, serve it with some ice cream, garnish, and voila!  Besides, most restaurants outsource their desserts to pastry chefs or local bakeries.  Take a trick from the pros. 

She'll be impressed.

Sunday, April 10, 2011

Assembly Required

Sometimes I just don't feel like cooking . . . After a long, busy day the idea of getting back to work in the kitchen just feels like too much of a hassle.  I suppose I could always go out for a bite or pick something up, but my wallet and waistline know better.  

Tonight is one of those nights.  I made a quick platter (dinner) based on some ingredients I already had in the fridge.  Perhaps not the healthiest or balanced meal in the world, but that's why I'm enjoying a glass or two of red wine on the side.  

Marinated Olives, Aged Wisconsin Cheddar, Toasted French Bread Cubes, and Sopressata.  

Yes, this is a great appetizer for a date night.

No cooking - just assembly . . .  and delicious to boot!


Saturday, April 9, 2011

Saturday Breakfast

It's always fun to have an old friend in town for the weekend, especially when there's no agenda.  Past a certain age - let's call it late twenty-something - the gravity of bright lights and noisy bars has less of a pull.  Contented to stay in and cook a good meal, drink some wine, and catch up on the goings on of the last few months, a lazy brunch is the right way to start a Saturday of . . . whatever.

Hope you and yours are enjoying the same freedom of time out of mind.

MM

Poached Eggs over Cajun Roasted Hash and Mixed Greens
1 Russet Potato, diced
1/4 Cup Onion, diced
1/4 Cup Red Bell Pepper, diced
4 Cloves Garlic, smashed
Extra Virgin Olive Oil
Balsamic Vinegar
Cajun Seasoning
4 Eggs
2 Large Handfuls Organic Mixed Greens


Preheat oven to 400 degrees F.  Add the first four ingredients into a cast iron skillet over medium heat with 1/4 cup of extra virgin olive oil, season liberally with Cajun seasoning.  Lightly fry potatoes until browned, and insert into oven and cook for 40 - 50 minutes.  Meanwhile, fill a large skillet with at least 3 inches of water and bring to a slow simmer over medium high heat.  Carefully crack eggs into the water, and poach for 3 - 4 minutes.  Remove eggs using a slotted spoon.  Toss greens in a 3 - 1 ratio of oil to balsamic vinegar and plate next to a generous portion of the potato hash.  Place poached eggs on top of hash and season lightly with Cajun seasoning.  Serve.


Friday, April 1, 2011

On Grilling Steaks

Just as I write a post about spring meals, it's turned cold and gray here in Nashville.  Instead of sulking, I'm continuing my spring weather sunshine dance.  I'm actually taking off to LA to catch some CA sunshine and warm weather - much needed.

The coming of spring will also mean it's time to dust off that grill and invite friends over for a day full of cold beers and grilled food.  This is probably my happiest time of the year.  Watching raw meat sizzle on a grate over hot coals . . . cold beer in hand . . . perhaps a few Bloodkin tunes in the air . . . and good friends.  Doesn't get much better.

Except for when my steak is not cooked properly!

Call me a food snob, but it is what it is.  A poorly cooked steak is as much of a sin as a beautiful woman who's neglected.  Take care of both of them boys.

Choosing the right cut:
I say it time and time again - your meal will only be as good as your ingredients.  If you buy a poor cut of meat, it will taste like a poor cut of meat.  Yes, there are marinades or techniques which can enhance flavor or texture, but those should only be used on quality cuts. 

I'm not a huge fan of marinades for your most 'popular' cuts of steak: filet, rib-eye, shell/strip, porterhouse, etc.  These cuts should be cooked with minimal ingredients - salt, pepper, butter.  I save my marinades for cheaper cuts like skirt, sirloin, tri-tip, hanger, flat iron, etc. 

Find a good butcher and ask for their best quality cut for the type of steak you are wanting to cook.  Notice I said quality cut - not expensive cut.  You don't need to spend an arm and a leg to get a good piece of meat. 

The method:
It doesn't matter to me whether you utilize a grill or a grill pan.  Of course, the outdoor ambiance I described above is much preferred, but not all of us are so lucky.  If you don't have access to a grill, invest in a cast-iron grill pan.  Trust me - it will change your life.  Just make sure your kitchen is well ventilated.  Trust me on that too.

You should always pull your steaks out of the fridge an hour or so before cooking.  This will bring the steaks back to room temperature and ensure that your steaks cook evenly.  Because I cook my steaks rather quickly, I don't mind seasoning them in advance with salt and pepper.  The purist will tell you to salt your steak only after cooking, as salt will pull out the moisture.  It's up to you - personally, I don't detect a loss in moisture by seasoning my steaks just before hitting the fire.

With regards to marinades, acidity is the key factor to help tenderize some of those tougher cuts of meat described above.  I prefer a 3 to 1 ratio of oil to acidity (vinegar, wine, fruit juice, tomato, etc).  Adding in garlic, herbs, or other ingredients is up to your discretion.  Just don't be the dude who lists off 20 different ingredients to your signature steak.  You'll look like an asshole.  Yeah, you. 

Searing the steak over high heat creates flavor.  Whether it "locks in juices" is up for debate - especially for all of you Alton Brown fans out there.  Either way - I start out by searing the steak over direct heat to create nice grill marks.  Depending on the thickness  and cut, about 2 - 3 minutes will do for a steak that's 1 - 1 1/2 inches thick.  To get that restaurant quality look, you will want to turn the steak 45 degrees and cook for another 2 minutes.  Don't poke and prod.  Just let the steak do it's thing.  After creating that outstanding sear, you will want to flip the steak and move to indirect heat.  Cover the grill to finish cooking, another 4 - 5 minutes depending on the cut and your preference.  Note:  if using a grill pan, sear the steak over medium high heat on the stove top, and insert into an oven heated to 425°F to finish cooking. 

Rest:
Just as the steaks have reached your desired preference, remove them from the heat and allow to rest on a cutting board for 5 minutes before serving.  This will allow the juices to redistribute.

Is it done?
Do not cut into the steak while it's cooking.  I know you've seen this technique before - it's for amateurs.  Instead, invest in a digital thermometer if you are new to the grilling game.  For the more experienced, you can use the tried and true 'touch' method as a reference.

Rare: Red, cool to warm center and the meat will be soft and spongy.  Final temperature reading should be 120°F.

Medium rare: Red, warm center and the meat will have a springy firmness.  Final temperature reading should be 125°F.

Medium: Hot, pink center and the meat will have a less springy firmness than medium rare.  Final temperature reading should be 135°F.

Medium well: Slight color, cooked throughout and the meat will feel firm.  Final temperature reading should be 145°F.

Well done: The meat is gray-brown throughout and very firm and unyielding.  Final temperature reading should be 160°F.

Happy Grilling!

MM